Create powerful voice intake forms with Sayify's 7‑step wizard — configure 30+ question types, AI extraction, conditional routing, auto‑responder emails, integrations, and embed options.
Form Builder
The Form Builder is where you create and configure your intake forms. It's a guided 7‑step wizard that walks you through everything — from naming your form to embedding it on your website.
Accessing the Form Builder
There are two ways to open the Form Builder:
- Create new — Click the + Create Form button from the sidebar or dashboard.
- Edit existing — Click the Edit button on any form in your forms list.
- From a template — Click Use Template on the Templates page. The wizard opens with everything pre‑filled.
Step 1: Basics
Set the foundational details for your form.
| Field | Required | Description |
|---|---|---|
| Form Name | Yes | Internal name for your form. Shown to respondents on the welcome page unless overridden. |
| Custom Slug | Yes | The URL‑friendly identifier for your public link (e.g. product-feedback). Must be lowercase with hyphens, minimum 3 characters. |
| Description | — | Supporting text shown below the title. Tell respondents what you're collecting and why. |
Slug Auto‑Generation
When you type a form name, Sayify automatically generates a slug from it. For example:
- "Product Feedback" →
product-feedback - "Q2 Customer Survey" →
q2-customer-survey
The slug is checked for uniqueness in real‑time — you'll see a green checkmark () when it's available, or a suggestion if it's already taken.
Tip: You can manually edit the slug at any time. Once you start typing in the slug field, auto‑generation stops.
Step 2: Questions
The heart of your form. This is where you add, configure, and order your questions.
Split‑View Editor
The Questions step uses a split‑view layout:
- Left panel — A scrollable list of question thumbnails showing the question number, type icon, and a snippet of the prompt text. Drag‑and‑drop to reorder.
- Right panel — The full question editor for the currently selected question.
Adding Questions
- + Add Question — Adds a new blank question at the bottom.
- Import CSV — Bulk‑import questions from a CSV file (one question per row).
Question Editor
For each question, you can configure:
| Setting | Description |
|---|---|
| Question Prompt | The text of the question (what the respondent sees). |
| Field Key | A developer‑friendly identifier used in webhooks, APIs, and integrations (auto‑generated, editable). |
| Response Type | Choose from 30+ types across 7 categories — see below. |
| Required / Optional | Control whether respondents can skip this question. |
| Configuration | Type‑specific settings (e.g. choices for multiple choice, scale range for NPS, file types for upload). |
| Dynamic AI Probing | Enable AI follow‑up questions based on the respondent's answer (Pro plan). |
| AI Intelligence | Per‑question evaluator configuration for automatic insight extraction. |
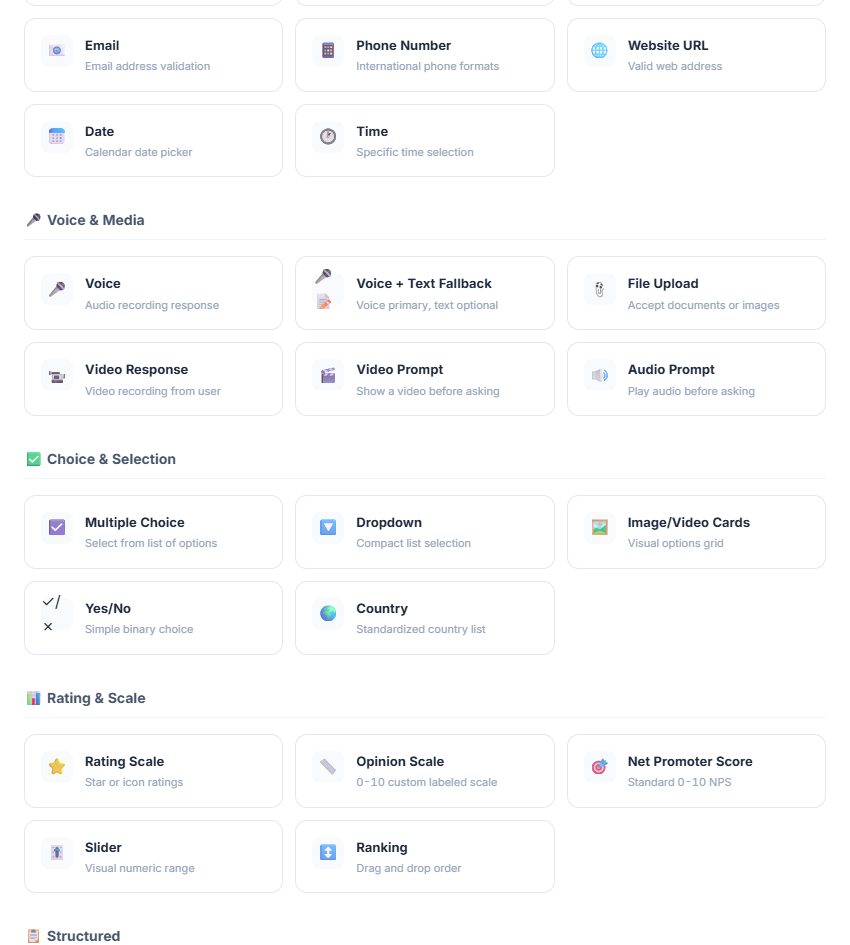
Response Types
Sayify supports 30+ response types organised into 7 categories:
Basic
Short Text · Long Text · Number · Email · Phone · Website URL · Date · Time
Voice & Media
Voice · Voice + Text Fallback · File Upload · Video Response (Pro) · Video Prompt · Audio Prompt
Choice & Selection
Multiple Choice · Dropdown · Image/Video Cards · Yes/No · Country
Rating & Scale
Rating Scale · Opinion Scale · NPS · Slider · Ranking
Structured
Address · Contact Info · Matrix
Help & Guidance
Statement · Help Block (Pro)
Workflow
Legal/Consent · Signature · Scheduling · Calculated Field (Pro) · Payment
Visual Logic Designer
For complex forms with conditional branching, open the Visual Logic Designer — a graph‑based drag‑and‑drop builder that lets you:
- Create branching paths — skip irrelevant questions based on selections.
- Set conditional rules — show questions only when specific conditions are met.
- Define jump targets — route respondents to any question or directly to the end.
- Visualise the flow — see your entire form logic as an interactive flowchart.
Access it by clicking the Visual Designer button in the Questions step toolbar.
Note: If you have conditional routing configured and use drag‑and‑drop to reorder questions, you'll be prompted to either open the Visual Designer or reset the routing to simple linear flow.
TTS Per‑Question Preview
When Voice Read‑Aloud is enabled, each question thumbnail shows a speaker icon. Click it to hear an AI‑generated preview of how that question will sound to respondents.
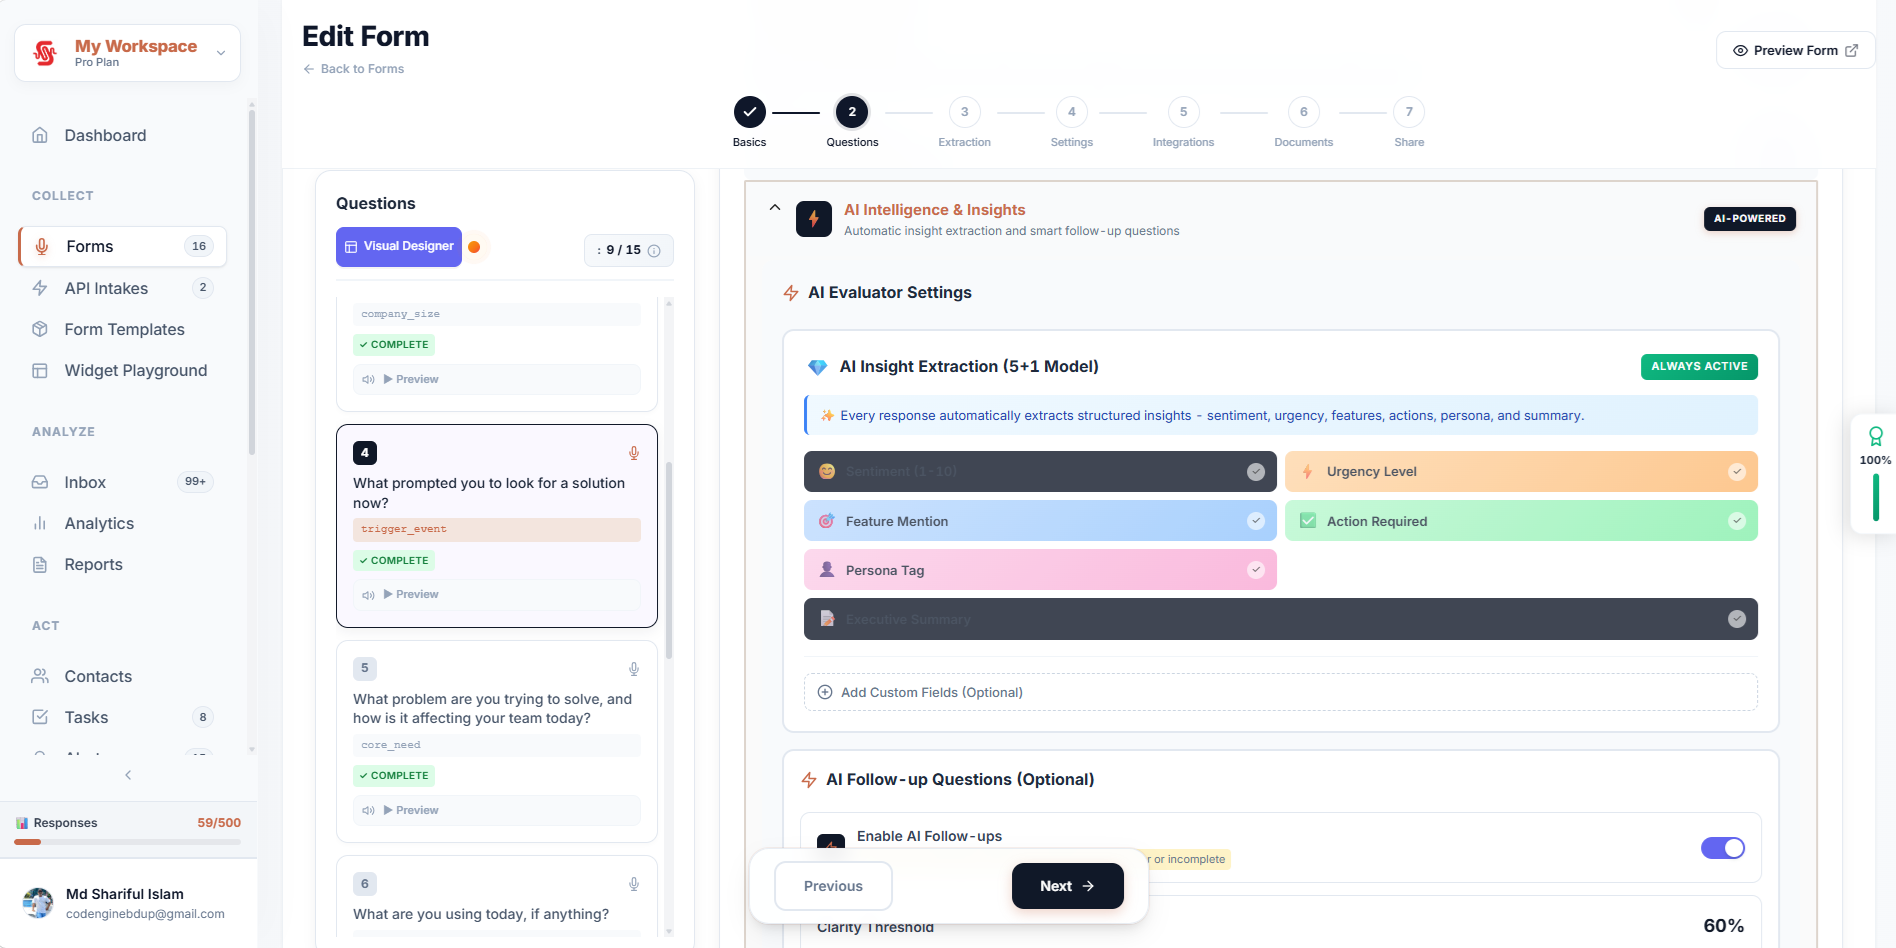
Step 3: AI Extraction
Configure AI Field Extraction to automatically pull structured data from every response — even from unstructured voice recordings.
| Component | Description |
|---|---|
| Extraction Presets | Choose from 24+ pre‑built schemas (Lead Generation, Customer Support, Candidate Screening, Bug Report, etc.). |
| Custom Fields | Define your own extraction fields with JSON key, data type, AI instruction, and example output. |
| Preset Library | Browse and apply presets from a searchable library inside the panel. |
Each extracted field includes a confidence score so you can prioritise review of low‑confidence values in your Destinations pipeline.
→ Learn more about extraction presets
Step 4: Settings
The Settings step contains 7 configuration tabs covering every aspect of your form's behaviour.
Welcome & Thank You Pages
Customise the screens respondents see before and after your survey. This tab has two sub‑sections:
Welcome Page:
- Title, subtitle, and button text.
- Optional consent checkbox with terms/privacy links.
- Template gallery for pre‑designed welcome page styles.
- Live preview showing exactly what respondents will see.
Thank You Page:
- Title, message, and icon (emoji + colour picker).
- Confetti animation toggle.
- Redirect URL with configurable delay.
- Per‑page Meta Pixel and GA4 conversion events.
- Conditional Thank You — AI‑powered routing to different pages based on scores or answers (see Conditional Thank You).
Voice Read‑Aloud
Enable Text‑to‑Speech to have Sayify read questions aloud using a natural AI voice.
| Setting | What it controls |
|---|---|
| Voice Model | Choose from available AI voices (e.g. Kore). |
| Language | Spoken language (e.g. en‑US). |
| Speed | Playback rate (0.5× – 2.0×). |
| Auto‑Play | Automatically read questions as they appear. |
| Custom Prompt | Fine‑tune the AI voice style with a text instruction. |
Note: Voice Read‑Aloud is only available in Conversational mode layouts. It's disabled when using the Compact Builder (inline mode).
Auto‑Responder
Send a branded thank‑you email to respondents automatically after they submit.
| Setting | What it controls |
|---|---|
| From Name | Sender name (defaults to workspace name). |
| From Email | Sender address - use the default or a verified sender from Branding & Domain > Email Sending. |
| Subject Line | Email subject with merge tag support ({{first_name}}, {{form_name}}). |
| Reply‑To | Optional reply‑to address. |
| Email Template | Choose from workspace templates, the gallery, or the default. |
| Custom Heading | Personalise the email headline (e.g. "Thank you, {{first_name}}!"). |
| Body Text | Custom email body with merge tags. |
| Logo | Override workspace logo with a custom logo URL. |
Platform Alerts
Configure automatic alert rules that trigger when responses meet specific criteria. Build rules based on:
- AI sentiment scores — Alert on negative sentiment, low satisfaction, etc.
- Extracted field values — Alert when specific data points match conditions.
- Response metadata — Alert on specific question types, file uploads, etc.
Alert notifications are sent to your configured channels — see Alerts.
Global Smart Help
Connect Knowledge Bases to enable an AI‑powered "Need Help?" assistant across all questions in your form (Pro plan).
When respondents click the help button, the AI searches your connected knowledge bases and provides instant, contextual answers — reducing confusion and support tickets.
Hidden URL Parameters
Silently capture metadata via URL query parameters. Define the parameter keys you want to capture (e.g. user_id, campaign, utm_source). When respondents access your form with those parameters in the URL, the values are automatically stored with the submission.
Tracking & Analytics
Connect Meta Pixel and Google Analytics 4 to track form events.
Tracking IDs:
- Meta Pixel ID (e.g.
123456789012345) - GA4 Measurement ID (e.g.
G-XXXXXXXXXX)
Per‑Event Configuration:
Configure which events fire at each lifecycle stage:
| Event | When it fires | Example Meta Event | Example GA4 Event |
|---|---|---|---|
| Form View | Page load | ViewContent |
page_view |
| Form Start | "Get Started" click | InitiateCheckout |
begin_checkout |
| Form Submit | Successful submission | Lead |
generate_lead |
Step 5: Integrations
Send responses to external apps and services in real‑time.
Supported Integrations
| Integration | Plan | Description |
|---|---|---|
| Webhook | All plans | Send raw JSON payloads to any URL. |
| Slack | Starter+ | Post response summaries to Slack channels. |
| Google Sheets | Starter+ | Append responses as rows in a spreadsheet. |
| Zapier | Starter+ | Connect to 5,000+ apps via Zapier triggers. |
Filter Rules
Each integration supports filter rules — conditions that control when data is sent. For example:
- Only send to Slack when sentiment is negative.
- Only append to Google Sheets when lead score > 70.
- Only trigger the webhook when a specific field is extracted.
Filters use AND or OR logic and can reference any extraction field.
JSON Schema Preview
For developers, the Integrations step includes a Structured Output Preview — showing the exact JSON schema of your form's response payload, including all questions and extraction fields.
Step 6: Documents
Attach downloadable reference materials to your form — guides, PDFs, images, or any files that respondents can download during or after the survey.
Note: You must save the form first before attaching documents. Click "Save Form & Continue" to proceed.
Step 7: Share & Embed
Get your public URL, embed codes, and configure widget deployment.
Public URL
Your form's public link is automatically generated:
https://your-subdomain.sayify.pro/i/your-slug
Embed Modes
Sayify offers 9 embed modes via the Widget Playground:
- Inline — Embed the form directly in your page.
- Popup — Open the form in a modal overlay.
- Slider — Slide the form in from the side.
- Chat Bubble — A floating button that expands into the form.
- Full Page — Take over the entire browser window.
- …and 4 more modes for different use cases.
Widget Configuration
The embed code panel generates ready‑to‑use HTML/JavaScript snippets with your form slug, widget mode, and any hidden field mappings pre‑configured.
Page Layout & Appearance
From the Share step, you can jump directly to Settings → Branding to customise your form's layout template, visual style preset, and colours.
Edit Mode vs. Create Mode
| Feature | Create Mode | Edit Mode |
|---|---|---|
| Slug | Auto‑generated from name, then manually editable | Pre‑filled, manually editable, uniqueness re‑checked |
| Questions | Start with one blank question | All existing questions loaded (with UUIDs for in‑place updates) |
| TTS | Configure, saved on form creation | Auto‑saves changes with 800ms debounce |
| Questions | Saved on form creation | Auto‑saves when TTS is enabled (1500ms debounce) |
| Integrations | Assigned after form creation | Loaded from existing assignments |
Template Pre‑fill
When you create a form from a template, the wizard is pre‑filled with:
- Form name and description.
- All template questions with their types, configuration, and routing.
- Welcome page and thank‑you page settings.
- Extraction schema (from template or auto‑matched preset).
- Alert rule presets.
- Widget configuration.
- Use‑case context for AI‑powered features.
Tip: Everything from a template is fully editable — it's just a starting point. Modify any setting before publishing.
Frequently Asked Questions
How many questions can I add?
The maximum number of questions depends on your plan. Free plans have lower limits; Pro and Enterprise plans support unlimited questions.
Can I import questions from a spreadsheet?
Yes. Click Import CSV in the Questions step to bulk‑import questions from a CSV file.
Does the form auto‑save?
In edit mode, TTS settings and question changes auto‑save when TTS is enabled. All other changes are saved when you click the save/update button.
Can I reorder questions with conditional logic?
Yes, but with a caveat. If you have conditional routing configured, drag‑and‑drop reordering will prompt you to either open the Visual Logic Designer or reset routing to linear flow.
What happens to my integrations if I delete a question?
Integration filter rules that reference deleted questions or fields will stop matching. Review your integration configuration after removing questions.
What's Next?
- Intake Page — See what the respondent experience looks like.
- Templates — Browse pre‑built templates with 30+ question types.
- Conditional Thank You — Route respondents to different pages based on AI scores.
- Destinations — Review and push extracted data to your CRM.
- Inbox — Manage incoming responses.
- Alerts — Set up AI‑powered notifications for new responses.
- Branding — Customise layout templates and visual styles.